 In the world of metrology, measurement uncertainty and its level of impact on calibration plays a huge role in decisions about what products to purchase, along with who to receive calibration services from. Minimizing measurement uncertainty is key for anyone making critical measurements, but many may be confused about what measurement uncertainty is and how to determine the significance of an assigned value.
According to the JCGM 200:2012 – International vocabulary of metrology – Basic and general concepts and associated terms (also known as the VIM), measurement uncertainty is defined as a non-negative parameter characterizing the dispersion of the quantity values being attributed to a measurand, based on the information used. Measurement uncertainty not only includes components arising from systematic effects, such as components associated with correction and the assigned quantity values of measurement standards, but also includes the definitional uncertainty, or rather the component of measurement uncertainty resulting from the finite amount of detail in the definition of a measurand. Understanding what measurement uncertainty is and how to properly analyze it is fundamental in performing measurements, regardless of the risk associated with them.
IDENTIFICATION OF SOURCES OF UNCERTAINTY
Identifying sources of measurement uncertainty for a given product or set of measurement and test equipment can be incredibly difficult. Typically, finding what these sources of uncertainty are requires time and effort spent on research and development from either an OEM or by the user of the product with respect to actually using the equipment. From the perspective of our ISO/IEC 17025 Accredited Laboratory, evaluating the measurement process along with evaluating the equipment used are the first steps in identifying what your major and minor contributors to measurement uncertainty are. Typically, factors that can be treated as sources of uncertainty that influence the measurement result of a process include:
- Accuracy
- Drift
- Environmental factors
- Hysteresis
- Linearity
- Measurement bias
- Operator bias
- Precision
- Resolution
- Repeatability
- Reproducibility
- Stability
- Wear and tear
ESTIMATION AND COMBINATION OF UNCERTAINTIES
Combining uncertainties can be mathematically involved and time-consuming. Typically, the easiest way to perform numerical evaluation of combined measurement uncertainty is to build a spreadsheet / calculator or develop a software algorithm that performs the analysis for you. Depending on what parameters you have defined as your sources of uncertainty, you can determine the best method for the combination of uncertainties.
The most common method used is known as a Root-Sum-Squares (R.S.S.) approach and in general can be deemed sufficient with an understanding that the method may result or not include additional uncertainties that could have been accounted for using another method that takes into account weighting factors, error correlations, or correction factors. The RSS method can be represented in the following form:

where uc is the combined uncertainty, ui represents the individual uncertainty terms (i.e. accuracy, hysteresis, repeatability, etc.) and the summation occurs across n terms (i.e. the number of individual uncertainty terms to be combined). Once you have performed this calculation, you have your measurement uncertainty. Typically, OEMs or calibration facilities apply coverage factors to the value to determine what the expanded uncertainty of the system is, as shown by the following equation:
![]()
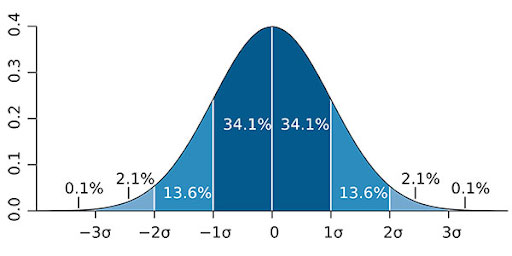
where U is the expanded uncertainty and k is the coverage factor. The expanded uncertainty is your uncertainty in measurement estimated to a confidence interval of your choosing. These confidence intervals typically range anywhere from 1 to 3 (as shown in the following image).

EVALUATION ADVICE
Every measurement system is different, however, they share similarities in how you can analyze sources of uncertainty of the system. To save yourself time, keep in mind the following three tips from our measurement science experts:
Tip #1: Regardless of the techniques / methods you use for evaluating and expressing the uncertainty of a measurement result, it should be universal; the method should be applicable to all kinds of measurements and to all types of input data used in measurements.
Tip #2: The quantity used to express measurement uncertainty should be both consistent and transferable. By consistent, we mean that it should be directly derivable from the components that contribute to it and by transferable, we mean that it should be possible to use directly the uncertainty evaluated for one result as a component in evaluating uncertainty of another measurement in which the first result is used.
Tip #3: When determining possible sources of uncertainty, you should ask yourself:
1. What is being measured?
- This will help you determine measurement bias and/or resolution of the process or the unit under test.
2. What are you measuring it with?
- This will help you determine measurement bias and/or resolution of calibration equipment.
3. Where is the measurement performed?
- This will help you determine repeatability and environmental influence factors
4. Who is making the measurement?
- This will allow you to detect operator bias.
5. What happens after the measurement?
- This will help you determine if drift or stability errors exist.
UNCERTAINTY ANALYSIS WITH DWYER INSTRUMENTS, INC.
Estimation of measurement uncertainty can be a daunting task, but it doesn’t have to be. With the right methods for performing measurements in place, along with adequate documentation for your instrumentation and access to metrology experts, uncertainty analysis can be made simpler.
By choosing Dwyer Instruments, Inc. for your accredited calibration needs, you not only will be provided detailed ISO/IEC 17025 certificates of calibration with your products, but you also gain access to a metrology and quality dedicated staff who can help you with your measurement uncertainty analysis needs.
If you have any questions about the material presented, or if you have any ISO 17025 related questions, please reach out to our ISO/IEC 17025 Management Team at accreditedcal@dwyermail.com ; we are always happy to help.

